Google Apps Migration for Outlook
1. Download, install, and import
You can use Google Apps Migration for Microsoft Outlook® to import data from a Microsoft® Exchange account or PST file, by stepping through a simple migration wizard. You can import your mail, personal contacts, and calendar events, either all at once, or one application at a time.
- If you haven’t already, sign in to your Google Apps account on the web at least once, to accept Google’s Terms and Conditions.
- Install Google Apps Migration for Microsoft Outlook® on the computer where you run Microsoft Outlook®, which should not be running. Use one of the methods below to install (whichever one applies for you).
I’m downloading Google Apps Migration myself
- If you are your domain’s administrator, enable Google Apps Migration for Microsoft Outlook® for your domain by making some quick settings in your Google Apps control panel, as described in these system requirements. Otherwise, skip this step as it’s probably already been done for you.
- Review these system requirements for your computer. Before continuing with installation, install any necessary updates to your version of Microsoft Outlook® or Windows.
- Go to the Google Apps Migration for Microsoft Outlook® download page and click the big blue download button to download and install the utility.
- From the Windows Start menu, open Google Apps Migration for Microsoft Outlook®.

My administrator downloaded it for me
If you belong to a large organization, your administrator might have prepared an installation file for you. In that case, all you have to do is install it.
- From your Windows Control Panel, open Run Advertised Programs, select Google Apps Migration for Microsoft Outlook® from the list of programs, and click Run to install the wizard.
- From the Windows Start menu, open Google Apps Migration for Microsoft Outlook®.
After starting the wizard, you’re asked to sign in to your Google Apps account…
2. Sign in to Google Apps
After starting Google Apps Migration for Microsoft Outlook®, you’re prompted to sign in to your Google Apps account. Signing in here lets Google Apps Migration connect to your account to get ready for importing.
- Enter the email address that you use to log in to your Google Apps account.
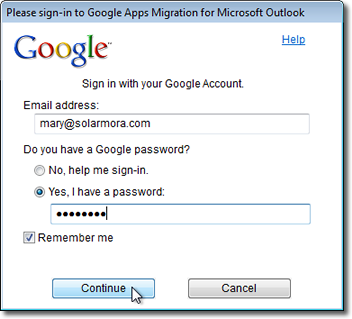
- Enter your password, choosing one of the following options:No, help me sign in: Select this option if you’ll be using a non-Google Apps password to sign in to your account—that is, if your administrator has set up a Single Sign On service that signs you in to other services in your organization, along with your Google Apps account.Yes, I have a password: Select this option if you’ll be signing in with your Google Apps password. Then enter the password here, too. (If no one has told you otherwise, this is probably the option you should select.)
- Check Remember me if you think you might be importing data to this account again from the command line. That way, when you next import data from the command line, Google Apps Migration won’t ask you to sign in.
- Click Next in the wizard to continue.
Now you need to choose the Microsoft Outlook® profile you want to import..
3. Choose what Outlook data to import
Next, Google Apps Migration for Microsoft Outlook® asks you to select where to import data from. You can import data directly from a Microsoft® Exchange profile. Or export it first from Microsoft Outlook® as one or more PST files, and import those files.
- Choose where to import your data from, as follows:If your existing profile is listed, choose its profile name to import directly from the profile—Google Apps Migration takes a snapshot of the profile’s current data and imports just that. If instead you’ve exported your data to a PST file, choose From PST File(s) and browse to the file on your computer or network. (Control-click multiple PST files to import them all at once.)
You can’t import PST files that are read-only. The migration utility needs write permission to access your data 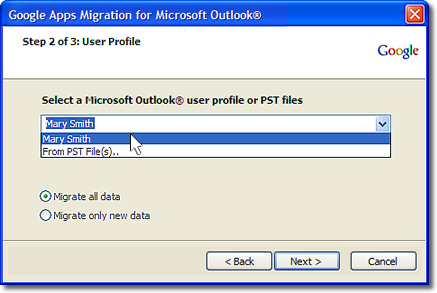
- If you’ve already imported data into this account, choose the appropriate migration option, as described below. (If you’re importing for the first time, either option works fine):
- Migrate all data: Imports all your mail, contacts, and calendar events. You can choose this option for your initial migration. Or, choose it if you’ve deleted all previously imported data from this account (such as after a test migration), and want to import all your data again.
If you already have data in this Google Apps account, choosing this option will import duplicate contacts and overwrite your existing calendar data (email won’t be duplicated). - Migrate only new data: Imports only data that hasn’t been imported before (doesn’t duplicate contacts or overwrite existing calendar data). Choose this option to resume a migration that didn’t fully complete (say, if you had to turn your computer off), or to import data that arrived after your first migration.
- Migrate all data: Imports all your mail, contacts, and calendar events. You can choose this option for your initial migration. Or, choose it if you’ve deleted all previously imported data from this account (such as after a test migration), and want to import all your data again.
- Click Next in the wizard to continue.
All that’s left is selecting what data to import…
4. Start importing data
Finally, you need to select what data to import—your email, contacts, calendar events, or all of the above.
Specify what to import, and whether to import only mail that was sent before or after a particluar date (just check each appropriate box). To speed up your import, uncheck Junk mail and Deleted items as you probably don’t need any of these messages.
Importing before or after a particular date? The date you choose is effective as of midnight GMT. Messages are migrated based on the time they were submitted to the Microsoft® Exchange server as outgoing messages.

What Gets Imported?
The following data can be imported from the current Microsoft Outlook® profile or PST file:
- Email messages: Messages from all folders in your profile or PST file, except the Deleted Items, Junk E-mail, and Public folders.
- Deleted messages: Messages from your Deleted Items folder.
- Junk email: Messages from your Junk E-mail folder.
- Contacts: Personal contacts (global contacts are provided by your administrator).
- Calendars: Events from your all your calendars.
Note that Microsoft Outlook® Notes, journal entries, and tasks are not imported, since these features aren’t available in Google Apps.
- Click Migrate in the wizard to begin importing. If you’re importing from a Microsoft Outlook® profile rather than a PST file, you might be prompted to log in to your profile.
Now just sit back and let your data import. Here’s what to expect…
5. Monitor your migration
Once you start the migration, Google Apps Migration for Microsoft Outlook® begins to import data to your Google Apps account. Contacts are imported first, followed by calendar data, and then email. If you’re importing more than one PST file or email account, each file or account is imported in sequence (completing one before moving on to the next).
If you’re importing from a Microsoft® Exchange profile, Google Apps Migration takes a snapshot of data currently in the profile and imports just that; it doesn’t import any messages received afterwards.
You can monitor your migration’s process to see the number of items migrated and the number of items remaining.
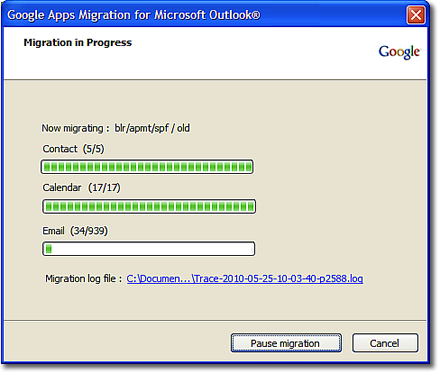
When your migration has finished, you can click Start new migration to import more data (if you’re migrating in stages). Otherwise, click Cancel to close the wizard.
You’re now ready to log in to your Google Apps account!
What to expect during migration
- How long does it take? Depending on how much mail and other data you have, it might take several hours for all of it to import (although you can begin to work in your Google Apps account right away).
- Pause a migration. To temporarily halt importing, click Pause Migration. Click Resume Migration to continue importing from where you left off.
- Restart a migration. If your import is interrupted and you need to run the migration again (say, if you click Cancel in the wizard or if you have to shut down your computer), simply rerun the wizard. To avoid importing duplicate contacts, select the option to Migrate only new data.
- My Internet connection went away. If the migration is interrupted without closing the wizard—say, if your Internet connection goes away—it will resume where it left off if the connection comes back soon. Otherwise, you should start a new migraiton. To avoid importing duplicate contacts, select the option to Migrate only new data.