Sending a vacation notice and Set up an automatic reply

Sending a vacation notice

A vacation notice informs the sender of an E-Mail that you do not have access to your E-Mails for a specific period of time. You can set the following:

  • the subject and text of the vacation notice
  • the time frame when the vacation notice is to be sent

How to create and activate a vacation notice:

  1. Click the System menu icon webmail_icon_menuebars on the right side of the menu bar. Click the Settings menu item.
  2. Select the entry E-Mail in the sidebar. Click on Vacation Notice.
  3. Enter a subject and a text for the vacation notice.
  4. Specify an interval for sending a vacation notice if there are several E-Mails from the same sender.
  5. Specify a time frame when the vacation notice is to be sent. Note: Depending on your installation, this option might not be available due to some reasons. In this case, contact your administrator or host.
  6. Activate the sending of the vacation notice by enabling at least one checkbox below Enabled for the following addresses. To deactivate the vacation notice, disable all checkboxes.

Tip: The vacation notice is entered as E-Mail filter. You can also edit the vacation notice in the E-Mail filter settings.

Use E-Mail filters In Webmail

5.5.19. Using E-Mail filters

E-Mail filters help you organize incoming E-Mail messages. An E-Mail filter consists of one or several rules. By setting rules you can e.g. trigger the following actions:

  • The E-Mail is moved to a specific E-Mail folder.
  • The E-Mail is forwarded to another E-Mail address.
  • The E-Mail is marked as read.

In order to use E-Mail filters, proceed as follows:

  • Create E-Mail folders.
  • Create one or several rules.
  • Specify an order for the rules.
  • Set if subsequent rules are to be processed when a rule matches.

A rule contains:

  • a name,
  • one or several conditions,
  • one or several actions. You can specify whether one or all conditions are to be met in order to process the actions.

The following options exist:

Some E-Mail functions automatically set up filters, e.g. the vacation notice.

How to create a new rule:

  1. Click the System menu icon webmail_icon_menuebars on the right side of the menu bar. Click the Settings menu item.
  2. Select the entry E-Mail in the sidebar.Click on Filter rules.
  3. In the display area, click on Add new rule. The Create new rule window opens.
  4. Enter a name for the rule.
  5. In order to add a condition click on Add condition. Make a selection from the drop-down menu. Please note the following:
    • In order to use an E-Mail part that is not contained in the list, select Header. Enter a header entry in the Name input field. You can display an E-Mail’s header by Viewing the source data.
    • In order to consider the BCC part, select Envelope – To. Envelope includes the E-Mail recipients entered in the ToCC or BCC field.
    • In order to use a part of the E-Mail content in the condition, select Content.
    • In order to use the date of receipt in the condition, select Current Date.Select a criterion from the drop-down next to the E-Mail part. Enter an argument in the input field.Examples can be found in the Questions about E-Mails.You can add further conditions. You can then specify whether one or all conditions are to be met in order to process the actions. To do so, click on Apply rule if all conditions are met.To delete a condition, click the Delete icon webmail_user_icon_trash next to the condition.
  6. Specify the action to be executed if the rule is met. To do so, click on Add action. Select an action from the menu. Depending on the action, further details might be required.You can add further actions.
  7. You can set whether subsequent rules are to be processed if the rule is met. To do so, enable or disable Process subsequent rules.
  8. Click on Save.

How to create a new rule when moving an E-Mail

  1. Select an E-Mail.
  2. Click the Actions icon webmail_user_icon_actions in the toolbar. Select Move from the menu.You can also use the Actions icon webmail_user_icon_actions in the detail view.Select a folder in the Move window. Click on the Move button.
  3. Enable Create filter rule. A note with details about the filter is displayed.Click on the Move button. The Create new rule window opens.
  4. Enter a rule name. You can adjust the conditions or actions. Click on Save.The E-Mail will be moved. The new rule will be created.

How to change existing rules:

  1. Click the System menu icon webmail_icon_menuebars on the right side of the menu bar. Click the Settings menu item.
  2. Select the entry E-Mail in the sidebar.Click on Filter rules.
  3. To edit a rule’s settings, click on Edit next to the rule. Change the settings in the Edit rule window.
  4. To disable a rule, click on Disable next to the rule.To enable a rule, click on Enable next to the rule.
  5. To change the order, hover the mouse pointer over the Move icon next to a rule. Drag the rule up or down and drop it appropriately.Note: This function is only available if there are at least two rules.
  6. To delete a rule, click the Delete icon webmail_user_icon_trash next to the rule.

Cyber Safe Girl eBook

Financial Security

SSL Certificate

Introduction to the types of SSL certificates that are provided by us:


1) Positive SSL

-Provides HTTPS secured link for a naked domain and it’s subdomain with “www.” (Example: abc.com and www.abc.com)
-$10,000 warranty provided by comodo.

2) Comodo SSL
-Provides HTTPS secured link for a naked domain and it’s subdomain with “www.” (Example: abc.com and www.abc.com)
– A Comodo SSL Certificate is the quickest and most cost effective way for an online business to protect customer transactions.
-$250,000 warranty provided by comodo.

3) Positive SSL Wildcard
-Provides HTTPS secured link for a naked domain and all of its subdomain. (Example: abc.com, www.abc.com, host.abc.com, domains.abc.com etc.)
-A Wildcard SSL Certificate saves you money and time by securing your domain and unlimited sub-domains on a single certificate. Wildcard certificates work the same way as a regular SSL Certificate, allowing you to secure the connection between your website and your customer’s Internet browser – with one major advantage. A single Wildcard SSL Certificate covers any and all of the sub-domains of your main domain.
-$10,000 warranty provided by comodo.

4) EV SSL
– Provides HTTPS secured link for a naked domain and it’s subdomain with “www.” (Example: abc.com and www.abc.com)
– An EV SSL certificate offers the highest available levels of trust and authentication to your website.
– The green address bar prominently displays your company name and provides highly visual assurance to customers that your site is secure – immediately giving them the confidence to complete their transaction.
– $1,750,000 warranty provided by comodo.

Transfer Domain

In order to transfer the domain to your account , please follow the steps below :

–> Log in to your Control Panel
–> Click on Products
–> Click on Domain Registration
–> Click on Transfer
–> Enter the domain name and the Auth code
–> Click on Transfer

The Transfer Auth Code/EPP Code can be obtained from the current domain service provider.

Before initiating a domain transfer, please ensure that the following checks are done :

1. The domain is not within first 60 days of registration or transfer
2. It does not have a transfer lock applied (also known as Theft Protection)
3. Privacy protection is disabled.
4. Domain name is not in the Redemption Grace Period or in the Pending Delete status

Once the transfer process has been initiated, the Registrant contact of the domain and the Losing Registrar will have to approve it.

The transfer process will be completed within 5-7 days.

Protected sheets and ranges improvements in Google Sheets

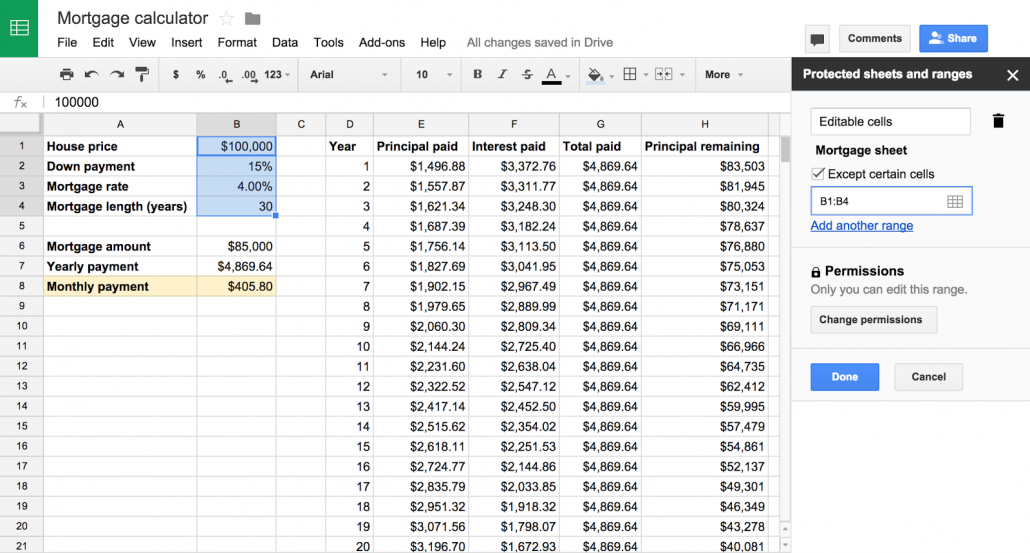
We’re launching several improvements to the protected sheets and ranges functionality in Google Sheets, providing faster and more granular control when locking down sections of content in spreadsheets.

Key changes include:

  • Ability to lock down all content in a sheet except a particular cell or range
  • Faster set up with the ability to re-use the same permissions you previously chose on a different set of cells
  • Ability to quickly lock down a sheet or range to only a single person, a small number of people or a domain


protected-1 google update

Release track:

Rapid release, with Scheduled release coming in two weeks

reference by:www.google.com


Easier guest access to Hangouts video calls on iOS

Last year, Google announced a new feature for Hangouts on the web allowing Google Apps customers to share links to Hangouts video calls so that external meeting guests may request to join if not explicitly invited. This feature helps external guests avoid errors when joining with alternate Google accounts.

The latest release of the Hangouts iOS app now has the same functionality, allowing external guests using the app to join Hangouts video calls from their mobile device with a meeting link provided by the organizer.
Notes:

  • Anyone in the same domain as the Hangout can make a video call externally accessible with the link
  • Video calls that are shared with the link require someone in the Apps domain of the Hangout video call to accept those requesting access on the web

This feature will be coming soon to the Hangouts Android app.

Release track:
Rapid release and Scheduled release

For more information:
Help Center
Get the Hangouts iOS app in the App Store


Reference by  www.google.com


Manage revisions for non-Google files in the new Google Drive

As available with the classic version of Google Drive, we’ve now incorporated the option to view and manage versions for non-Google file formats in the new Google Drive.

Simply right-click on a non-Google file (or click on it and use the ‘More Actions’ menu in the toolbar), and select ‘Manage versions.’

Release track:

Rapid release and Scheduled release


For more information:

Help Center

Reference by  www.google.com