Transfer Domain

In order to transfer the domain to your account , please follow the steps below :

–> Log in to your Control Panel
–> Click on Products
–> Click on Domain Registration
–> Click on Transfer
–> Enter the domain name and the Auth code
–> Click on Transfer

The Transfer Auth Code/EPP Code can be obtained from the current domain service provider.

Before initiating a domain transfer, please ensure that the following checks are done :

1. The domain is not within first 60 days of registration or transfer
2. It does not have a transfer lock applied (also known as Theft Protection)
3. Privacy protection is disabled.
4. Domain name is not in the Redemption Grace Period or in the Pending Delete status

Once the transfer process has been initiated, the Registrant contact of the domain and the Losing Registrar will have to approve it.

The transfer process will be completed within 5-7 days.

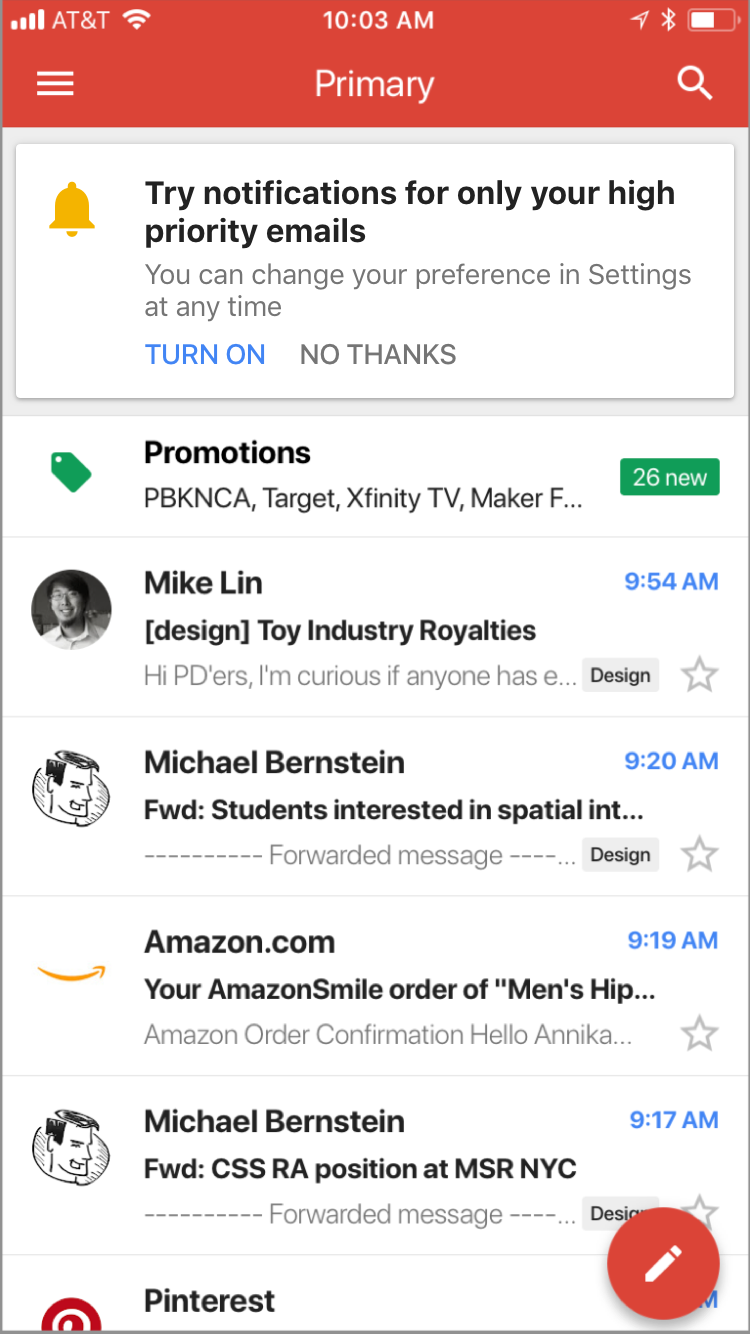
Receive notifications on your iOS device for high-priority emails only

Notifications are only useful if you have time to read them—and if you’re being notified hundreds of times a day, chances are, you don’t. That’s why we’re introducing a feature that alerts you only when important emails land in your Gmail inbox, so you know when your attention is really required.


These notifications leverage Gmail’s machine learning and artificial intelligence capabilities to identify messages you may want to read first. To enable the feature, select “High priority only” from the Notifications drop-down in the settings menu of your Gmail iOS app.

Available on iOS now and Android soon, we hope this feature makes your Gmail notifications relevant—not just noise.

Launch Details
Release track:
Launching to both Rapid Release and Scheduled Release

Editions:
Available to all G Suite editions

Rollout pace:
Full rollout (1–3 days for feature visibility)

Impact:
All end users

Action:
Change management suggested/FYI


Reference by Google.com

Everything you need to know about VPNFilter Malware


VPNFilter Malware:

It has been just reported that a dangerous malware called VPNFilter is targeting increasing number of makes and models of devices, with its additional capabilities like secretly injecting malicious content over web traffic through an infected router. This capability, called SSLER lets VPNFilter stage a kind of man in the middle attack, with an aim to spy on victims to steal sensitive data. Using this capability, SSLer allows the actor in delivering exploits to endpoints.

It has been found out that this malware is continuously targeting more makes and models of devices. With its additional and increased capabilities, exploits can now be delivered to end points and reboots can be overridden.

WHAT IS VPNFILTER Malware?

VPN Filter is a sophisticated malware which uses known vulnerabilities to infect routers made by Linksys, MikroTik, Netgear, QNAP and TP-Link. Once installed, the malware uses a central infrastructure to install specialized plug-ins on the router. One plug-in allows hackers to listen to their victims’ Internet traffic to steal their Web identifiers; another one targets a protocol used in industrial control networks, such as in the power grid. A third plug-in allows attackers to paralyze any or all infected hardware. Together, all of the infected units in dozens of countries make up a 500,000-router strong botnet.

Read about infected devices & solutions for VPNFilter attack here.


Reference by Gajshield.com

Old Gmail routing settings to be automatically converted starting July 11th

In January 2017, we announced some changes to the Gmail routing settings in the Admin console. For technical reasons, some of these changes were delayed past the originally communicated date and are now launching this month.

Convert old Gmail routing settings now

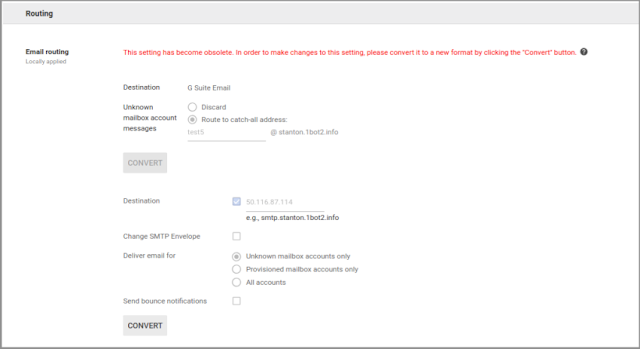
Going forward, your remaining Sending routing, Receiving routing, Catch-all address, and Domain-level routing settings are read-only. These settings are still active, but in order to make changes, you need to click the CONVERT button next to the existing rule.

Going forward, your remaining Sending routing, Receiving routing, Catch-all address, and Domain-level routing settings are read-only.

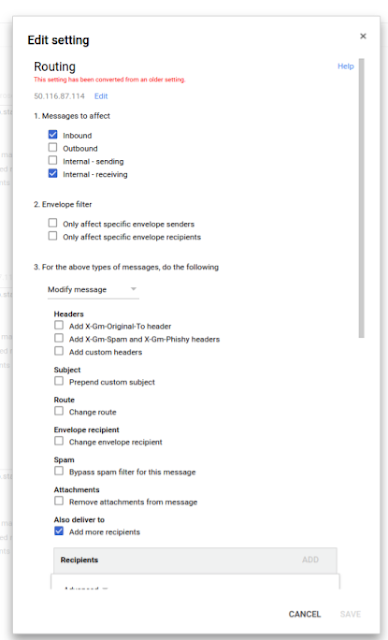
Once you click CONVERT, we’ll convert the setting and map it to the new fields automatically. The converted setting will then be placed in the unified routing section, where all of your rules will be manageable from one place. The old setting will no longer be visible in the user interface, so you won’t need to clean up old rules afterwards.

All settings automatically migrated starting July 11th

If you don’t convert your settings using the CONVERT button, they’ll be automatically migrated to the unified routing section no earlier than July 11th, 2018. This migration will take place over the course of several weeks.

Launch Details
Release track:

CONVERT button launching to both Rapid Release and Scheduled Release now
Automatic migration starting for both Rapid Release and Scheduled Release no earlier than July 11th, 2018

Editions:
Available to all G Suite editions

Rollout pace:

CONVERT button: Full rollout (1–3 days for feature visibility)
Automatic migration: Extended rollout (potentially longer than 15 days for feature visibility)


Reference by Google.com


How to Whitelist domain in Gsuite

Here are the steps:
1. In the Admin console Go to Apps > G Suite Gmail > Advanced settings.
2. Scroll to the Spam section, hover over the setting, and click Configure.
3. Enter a unique name for the setting
4. Check the Bypass spam filters for messages received from addresses or domains within these approved senders lists box.
5. Click Use existing or create a new one, enter a new list name, and click Create.
6. Hover over the list name, click Edit, and then click Add.
7. Enter domain name ‘abc.com’
8. Save

curtesy by google.com

How to Deploy Backup and Sync

How to choose a google sync solution

Work offline in the new Gmail

We can guarantee you’ll want to work on the go, but we can’t guarantee you’ll have Wi-Fi. Fortunately, native offline capabilities in the new Gmail make it possible to work without interruption—even when you don’t have an internet connection. Starting now, people using the new Gmail in a Chrome browser (v61 or higher) can search, write, delete, and archive up to 90 days of messages, even when they’re offline.

Enable Gmail offline for your domain

To get started, enable Gmail offline for your domain in the Admin console (the feature is disabled by default).

offline gsuite

If you want offline content deleted for your users when they sign out of their Google accounts, check the Force deletion of offline data on log out of Google account box. This will prevent your users from keeping content on their local devices when they log out.

Turn on Gmail offline for your account

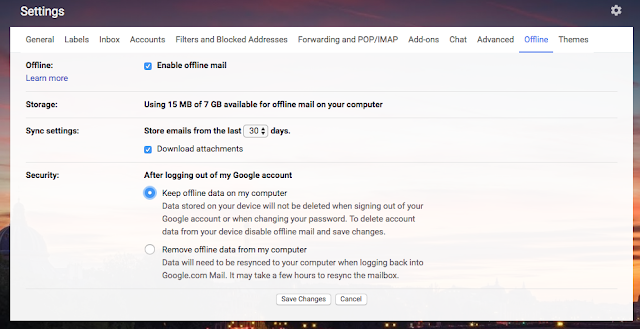
Once you’ve enabled Gmail offline for your domain, individuals who are using the new Gmail can turn it on from the Offline tab in their settings (the feature is disabled by default).

offline Gsuite

They can also choose whether to keep offline data on their computers or have it removed when they log out.

Uninstall the Gmail Offline Chrome app

We previously announced that we’re moving Chrome apps, like Gmail Offline, to the web. The Gmail Offline Chrome app will stop working in the future, so we recommend that users uninstall it and begin using the native offline feature as soon as possible.

Enable the new Gmail

These new native offline capabilities are only available to customers participating in the new Gmail Early Adopter Program (EAP). To opt in to the EAP and enable the new Gmail for your domain, follow the instructions in the Help Center.

For more information on Gmail offline, please visit the Help Center.

Launch Details
Release track:
Launching to both Rapid Release and Scheduled Release

Editions:
Available to all G Suite editions with the new Gmail enabled

Rollout pace:
Full rollout (1–3 days for feature visibility)

Impact:
Admins and end users

Reference by Google.com

SMTP and ESMTP error code list

It is important to figure out why your email bounces. If you receive an email bounce, you can look in the bounce message to find the proper error code that will give you the reason for the bounce. Below is a list of the Standard SMTP error codes and the Extended SMTP (ESMTP) error codes.

SMTP and ESMTP error codes

SMTP Error Codes

This list of codes is the standard SMTP error codes you will find in most email bounces.

Specific Explanation of the 400 Error Codes occurring on our servers:

450 4.1.8 : Sender address rejected: Domain not found

Our inbound servers require that the hostname for the sender server should have valid MX or A records in order to accept emails from it. You need to contact the sending server’s email admin to add valid DNS records for his server.

450 4.7.1 Client host rejected: cannot find your reverse hostname

Our inbound servers require reverse hostname for sender server IP to be present in order to accept the email. Please ensure that the valid PTR records are added for all outbound server IP’s. Post adding the required rDNS records our inbound servers will accept mails from the remote mail hosting server.

450 4.7.1 : Recipient address rejected: Policy Rejection- Quota Exceeded

This error comes from our incoming mail server if user is receiving excessive amounts of mails.

450 4.7.1 Recipient address rejected: Access denied.

This occurs when the recipient address is invalid. i.e., not in form of user@domainname OR if the Recipient address is blocked on server.

451 4.3.5 Server configuration problem – try again later;

451 4.7.1 Service unavailable – try again later;

This error most likely occurs if there is a configuration error with our servers. If you encounter any of the above messages, please contact our support helpdesk with the details.

452 4.5.3 Error: too many recipients

The error message is encountered when the user is exceeding the limit of more than 50 recipients in an email. The list of recipients is inclusive of To, Cc, and Bcc. If you encounter the above error, reduce the number of recipients in the email and try again.

Specific Explanation of the 500 Error Codes occurring on our servers:

522 5.7.1 :  Recipient address rejected: Requested mail action aborted: exceeded storage allocation

This error comes if the user is overquota.

530 5.7.0 Recipient address rejected: Authentication Required.

This error comes when your sending mails to remote domain without using SMTP authentication.

550 5.1.1 Recipient address rejected: User unknown in virtual alias table;

This is the bounce back message that is received by the sender from our server if the destination email address does not exist.
The same error message is received if the recipient has a mail loop. That is, if the recipient has set a forward to another email address and that email address is forwarded back to the original one. In this case, you need to remove the loop in order to receive the emails.
If there is a forward set for an account, and an email is sent to that account, if for some reason the forwarded email is not sent, the original sender may get the above error.
For example, abc@domain.com if forwarded to abc@dom.com, if a third user xyz@dom2.com emails to abc@domain.com, he may get the above error if the forwarded email is bounced.

550 5.1.1 Protocol error

This error code ideally suggests that the sender has used SMTP protocol instead of ESMTP, thus the outbound mail of the sender was rejected. In short, the sending client doesn’t properly communicate and makes errors in the SMTP protocol.

550 5.3.2 Service currently unavailable

The error code 5.3.2 usually means that the system is not accepting network messages. We would thus need to look outside Exchange for a connectivity problem.
The error code ideally occurs ideally for two reasons which are listed below:
1). The sending IP is blacklisted at an RBL or blacklist monitoring site. (You may verify the same by inputting the IP via this link: http://mxtoolbox.com/blacklists.aspx )
2). There is a temporary block on the IP on our Inbound server due to multiple mails from this IP. Feel free to contact our support desk for more information and regarding de-listing the same.
3). If sending IP does not have a reverse PTR record configured. Reference URL: http://mxtoolbox.com/NetworkTools.aspx

550 5.4.5 Recipient address rejected: Hourly domain sending quota exceeded

This is the error message that you get if your domain name exceeds the hourly quota set for the domain name. Here, the term ‘hour’ refers to the last 60 minutes.

550 5.4.6 Recipient address rejected: Hourly sending quota exceeded

This is the error message that you get if the user (that particular email address) exceeds the hourly quota set. Here, the term ‘hour’ refers to the last 60 minutes.

550 5.7.1: Helo command rejected: You aren’t localhost.
550 5.7.1: Helo command rejected: You aren’t localhost.localdomain.
550 5.7.1: Helo command rejected: You are not me

Our servers do not accept SMTP HELO command as HELO localhost or HELO localhost.localdomain or HELO . We accept HELO from a valid Domain Name or your computer name which is other than your domain name. Please check with your ISP or Mail administrator for this issue.

551 5.7.1 The message was rejected due to classification as Virus, Spam or high bulk ratio.

This is a bounce-back message that you receive when an email is classified as spam while sending out. If you feel that a genuine email is rejected as spam, you need to send the same email with the full headers and the content to our support team. That email in question will be reviewed manually.

552 5.3.4 Message size exceeds fixed limit

A 552 email error is typically encountered when there is a problem related to an attachment in your email. Either it has exceeded the size limits of the remote server, or the file-type isn’t allowed by the remote server.
1. For file extensions not allowed on our servers, please do refer to the following link: http://support.mailhostbox.com/file-extensions-that-are-not-allowed-as-attachments/
2. For mail (including attachment) sent across from our servers, we allow clients to send up to 30 MB of data.

Solution: Examine the size of the message including attachments. Try zipping the file content.

553 5.7.1 Sender address rejected: not owned by user user@domain.com

This is the error message that is received when you are trying to send an email as a different user. This error message is seen by the users who are using Exchange servers with our system.

You need to add an identity for the same in the webmail. For example,

Log into the webmail of user1@domain.com
Add the identity from the settings tab for user@domain.com (If the from address is user@domain.com). For more information, please refer: http://support.mailhostbox.com/email-users-guide/sender-identities
Once the identity is added and confirmed, you should be able to send the emails.

554 5.7.1 Service unavailable; Client host X.X.X.X blocked using zen.spamhaus.org;

This is the error message that is received of the IP address of the sender is listed at zen.spamhaus.org
For further details, please check http://www.spamhaus.org/zen
OR check http://www.spamhaus.org/query/bl?ip=<your_ipaddress> and contact zen.spamhaus.org to get the IP De-listed.

554 5.7.1: Relay access denied;

There are couple of reasons for this error while sending an email

If the domain is in the status “Pending Verification” in the control panel.
If the user has not checked the option “Our server requires authentication” option while setting up the account. For more information on setting up the email account, please refer: http://support.mailhostbox.com/email-users-guide/configure-your-desktop-…

554 5.7.1: Recipient address rejected: USER IS SUSPENDED

This error comes if a user is suspended in Control Panel.

554 5.7.1: Sender address rejected: Access denied.

This error comes when the sender address is blocked on our server. Generally, this is done if spam has originated from this user.

554-mx1.mailhostbox.com ESMTP not accepting connections OR 554-us2.mx1.mailhostbox.com ESMTP not accepting connections OR 554-in.mx1.mailhostbox.com ESMTP not accepting connections

When sending an email to a recipient within our mail hosting servers, sender may receive a bounce back stating ESMTP not accepting connections. The error indicates senders IP address is suspected of sending spam and is blacklisted.
Example Error:
Delivery has failed to these recipients or groups:
xyz@xyz.com
A problem has occurred during the delivery of this message to this e-mail address.Try sending this message again. If the problem continues, please contact your helpdesk.
Diagnostic information for administrators:
Generating server: mx1.mailhostbox.com
xyz@xyz.com
554-mx1.mailhostbox.com ESMTP not accepting connections

To resolve this issue, please perform the steps below:
1. Check sender’s IP address, if it is blacklisted in any RBL (Realtime Black List): http://mxtoolbox.com/blacklists.aspx. Ask sender to submit an IP removal request to RBLs.
2. Check IP reputation on mail filters by contacting CSI and get the IP delisted by visiting the following URL: https://csi.cloudmark.com/en/reset/ by providing the sender’s IP address.

200 Codes

  • 211 – System status/system help reply
  • 214 – Help message
  • 220 – Domain service ready
  • 221 – Domain service closing transmission channel
  • 250 – Requested mail action completed and OK
  • 251 – Not Local User, forward email to forward path
  • 252 – Cannot Verify user, will attempt delivery later
  • 253 – Pending messages for node started

300 Codes

  • 354 – Start mail input; end with.
  • 355 – Octet-offset is the transaction offset

400 Codes

  • 421 – Domain service not available, closing transmission channel
  • 432 – Domain service not available, closing transmission channel
  • 450 – Requested mail action not taken: mailbox unavailable. request refused
  • 451 – Requested action aborted: local error in processing Request is unable to be processed, try again
  • 452 – Requested action not taken: insufficient system storage
  • 453 – No mail
  • 454 – TLS not available due to temporary reason. Encryption required for requested authentication mechanism
  • 458 – Unable to queue messages for node
  • 459 – Node not allowed: reason

500 Codes

  • 500 – Syntax error, command unrecognized
  • 501 – Syntax error in parameters or arguments
  • 502 – Command not implemented
  • 503 – Bad sequence of commands
  • 504 – Command parameter not implemented
  • 510 – Check the recipient address
  • 512 – Domain can not be found. Unknown host.
  • 515 – Destination mailbox address invalid
  • 517 – Problem with senders mail attribute, check properties
  • 521 – Domain does not accept mail
  • 522 – Recipient has exceeded mailbox limit
  • 523 – Server limit exceeded. Message too large
  • 530 – Access Denied. Authentication required
  • 531 – Mail system Full
  • 533 – Remote server has insufficient disk space to hold email
  • 534 – Authentication mechanism is too weak. Message too big
  • 535 – Multiple servers using same IP. Required Authentication
  • 538 – Encryption required for requested authentication mechanism
  • 540 – Email address has no DNS Server
  • 541 – No response from host
  • 542 – Bad Connection
  • 543 – Routing server failure. No available route
  • 546 – Email looping
  • 547 – Delivery time-out
  • 550 – Requested action not taken: mailbox unavailable
  • 551 – User not local; please try forward path
  • 552 – Requested mail action aborted: exceeded storage allocation
  • 553 – Requested action not taken: mailbox name not allowed
  • 554 – Transaction failed

Extended SMTP (ESMTP) standards

The Extended SMTP error codes work in 3 digit combinations. For example, 5.2.1 is a Permanent Error where the receiving email is not accepting messages. The first number is the email message status. The second 2 numbers pinpoint the exact information about the error.

  • 2 Successfully sent the email;
  • 4 Temporary problem when sending the email. The email server typically will try to send it again till it reaches retry timeout.
  • 5 Permanent or Fatal error. This can be caused by a nonexistent email address, DNS problem, or your email was blocked by the receiving server.

Below is a list of the Extended SMTP error codes.

Reference by mailboxhostbox

Tips to Keep Kids Safe Online

Tips to Keep Kids Safe Online

The task of protecting our children online is a challenge that grows in complexity every day. Just a few years ago, parents mostly worried about the risks of “stranger danger” and online predators. Recently, research from the Harvard University-based Berkman Center downgraded online predators to a much lower risk category, but we still have many online risks to educate our children about. These risks can be categorized into three groups.

Cybercrime

The first category is cybercrime–or the threats caused by financially motivated strangers. Whether in the form of computer viruses, Trojan horses,phishing attacks, or spam emails, cybercrime keeps growing and changing each year. It’s so important for parents to stay on top of the varied threats. This can be daunting, especially if you feel you aren’t tech savvy or don’t know where to look for help. Fortunately there are several steps you can take to keep cybercrime in all its forms away from your computer, your home network, and your family’s information. Follow these tips yourself, and pass them along to your kids.
1. Use an Internet security suite, like Norton 360 or Norton Internet Security, on all computers you own. Using plain antivirus is just not enough protection. You need a full firewall, antispyware, and other protection a suite can provide.
2. Keep your home network secured with a good password and security settings.
3. Learn to avoid clicking links, responding to ads, and opening emails when they come from someone you don’t know or appear suspicious. Just take that extra moment to call your friend (“Did you post that link?”), type the URL for your bank, or otherwise display your worldly wisdom by not falling for these social engineering tricks.
4. Use a good password (unique and complex) on all accounts and devices. The two most important account passwords are for your social network and your email account. If a hacker gets control of your social network, he can scam your friends. If he has your email, he can reset the password on all your other accounts by using the ubiquitous “forgot my password” link.
5. Talk to your kids about avoiding cybercrime. They need to be just as cautious as you. It’s also important that they know if they can talk to you when they make an online mistake, like falling for a scamware alert and downloading something dangerous to the computer. Many kids are savvy enough to realize when they’ve downloaded a virus, but few are comfortable admitting their mistake to their parents.

Cyberbullying

The second category is the harm that can befall your child from people they know. Typically, this means cyberbullying, the single most common online harm our children will experience. Statistics vary, but at least 20 percent of kids will receive harassing, hateful, or insulting messages via social networks, emails, instant messages, videos, and texts.
Interestingly enough, unlike its non-tech relative, cyberbullying inherently allows roles to be reversed almost instantaneously. The victim can become the bully just by responding to a mean email with another verbal volley.

We have much work to do in our schools and online communities to promote online civility and kindness. We also need to promote appropriate responses when a child is confronted with cyberbullying. A great resource for information about all forms of bullying can be found at http://www.stopbullying.gov/ and specifically about cyberbullying at http://www.cyberbullying.us/ .
6. Advise your kids never to share passwords, not even with a close friend. If they think they did, they should change the password.
7. Teach your children to log out of computers when they finish their work, even at home. This will prevent a friend or sibling from posting or emailing using their account–even as a joke.
If your child is being cyberbullied, teach them to not respond, to keep a copy of all the messages, and to report it to the school or website. If the messages include threats, report this to the police. If you report the cyberbullying to the school, be sure to follow up in person and ask for a written plan on how the school will respond to the problem. Most states have laws against this form of abuse, and schools have an obligation to address the issue when made aware of it.

Online Reputation

The third category of online risk is the harm we cause ourselves. This can take many forms, including sexting (sending sexual content by photo, video, or text message); posting information or images of a private, embarrassing, or controversial nature; and even neglecting to set privacy settings.
Sexting is definitely not something we want our underage kids to engage in. Child pornography and other laws may require teachers, parents, and law enforcement to get involved if they become aware of these messages. Kids may think they are sharing these images within a private relationship, but too often the recipient shares the images, for any number of reasons. Perhaps the relationship has ended, maybe the recipient is bragging to friends, or perhaps a friend saw the images on the phone and forwarded them to others. (That is another reason to put a password on all devices!)

“Online reputation” is a term for all the information available about you on the Internet, whether through conducting a search or by viewing your profile on a social network. That composite portrayal of you can serve as a digital dossier, telling a story that may distort the real facts of who you are. We’ve often heard of young people self-sabotaging their academic, career, and romantic futures with silly posts, photos of underage drinking, or membership in controversial online groups.
The issue of privacy on the Internet is a growing concern for many. We each need to take steps to keep our personal information protected by securing our online accounts, limiting the information we post in public forums, and opting out of unused or unwanted online services. Our lives are being publicly documented to a degree that is increasingly uncomfortable. Just do an online search of yourself and you’ll see your 10K race scores, your home’s mortgage information, and your tagged photos on your social network. Private information can be used in numerous annoying and harmful ways, so it is increasingly worthwhile to pay attention to privacy issues–and to pass along good advice and habits to your kids.

8. Use the security and privacy settings on your social network and all accounts to limit who can access your posts.
9. Learn about parental control settings for your phones, gaming devices, tablets, and all computers. A great tool is the free Norton Family for PCs and Macs.
10. Talk to your kids regularly about how to use technology. Set rules and limits, and keep technology out in the open. Learn about “The Talk,” and make it an annual discussion, or for whenever you introduce new technology into your family life.


Courtesy :- Symantec