Manage iOS devices without MDM profiles

G Suite administrators who want their employees to use their own mobile devices at work face a challenge: all Enterprise Mobility Management (EMM) solutions available today require an agent or profile to mandate corporate mobile policies, but employees are uncomfortable setting up these agents and profiles on their personal devices. Oftentimes, they choose not to add their corporate accounts to their personal devices at all.

To meet the needs of both admins and employees, today we’re introducing an agentless way to manage iOS devices: Basic Mobile Management.
Basic MM 2
Basic MM 1
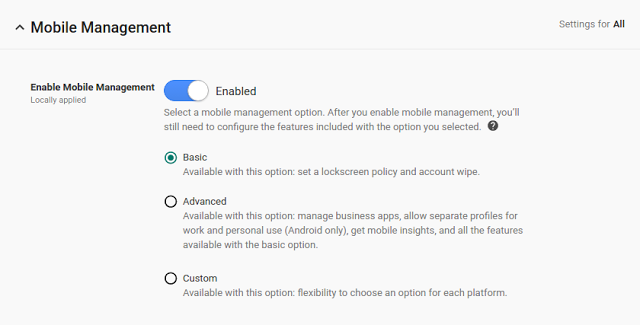
Basic Mobile Management allows admins to mandate basic security on iOS devices without requiring users to install an MDM profile. It also relieves admins of the need to set up an Apple Push Certificate and the hassles of renewing that certificate regularly.

With Basic Mobile Management, admins can:
Enforce a screen lock.
Wipe a corporate account (but not the entire device).
View, search, and manage their device inventory.

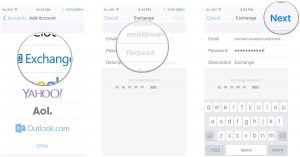
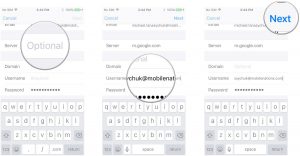
Basic Mobile Management makes it easier for employees to use their personal devices at work as well, by allowing them to set up their corporate accounts just like they would their personal accounts.

Organizations that require additional restrictions, mobile audit, or application management on iOS devices should continue using the Advanced Mobile Management option.

For more details on Basic Mobile Management and how to get started, check out the Help Center.

Please note that agentless management is only available for iOS devices at this time. Users will still need to install the Device Policy app on their Android devices, even if their admin has chosen Basic Mobile Management.

Launch Details
Release track:
Launching to both Rapid release and Scheduled release

Editions:
Available to all G Suite editions

Rollout pace:
Gradual rollout (potentially longer than 3 days for feature visibility)

Impact:
Admins only

Action:
Admin action suggested/FYI


Reference by Google.com

New iterative calculation settings and more in Google Sheets

To prevent the errors that sometimes plague complex calculations, today we’re launching a new setting in Google Sheets on the web (File > Spreadsheet settings > Calculation > Iterative calculation) that allows you to set the maximum number of times a calculation with a circular reference can take place. In addition, you can specify a “convergence threshold,” and when results from successive calculations differ by less than that threshold value, the calculations will stop (even if the maximum number of calculations has yet to be reached).
iterative-calc-settings- Google Sheets
Over the course of the week, we’ll make additional improvements to your Sheets experience on the web and Android devices. First, we’ll update the Sheets Android app UI to make it easier for users with right-to-left language settings to read and navigate. Second, we’ll make it possible to search the menus in Sheets on the web, much like you can in Google Docs and Slides.
menu-search-1- google sheets

menu-search-2

Search the menus while in Compact Controls mode

For more details on these features, please visit the Help Center.

Launch Details
Release track:

  • Launching to Rapid release, with Scheduled release coming on January 9th, 2017
    • Iterative calculation setting
  • Launching to both Rapid release and Scheduled release
    • Right-to-left language improvements
    • Menu search

Editions:
Available to all G Suite editions

Rollout pace:
Gradual rollout (potentially longer than 3 days for feature visibility)

Impact:
All end users

Action:
Change management suggested/FYI


Reference by google.com


Ransoc – An unusual ransomware that threatens to expose your personal information

Mostly a ransomware encrypts your files and demands money in exchange for a key that can decrypt the data. And the payment is demanded in Bitcoins. Ransoc is different in the way it works and the medium it uses for the payment.

How does Ransoc work?
Once your computer is infected by Ransoc, it gathers your personal information from your Skype and social media profiles and scans your system for Torrent files and other sensitive information. It then displays a ransom note. Interestingly, the ransom note is customized for a particular user and has their social media details including their profile picture. The ransom note threatens the victim with a fake legal proceeding and also that the ‘sensitive’ information found on their computer will be made public if the ransom is not paid.

Now, two important points to note here:

  1. Ransoc, unlike other ransomware, does not encrypt any files on the infected computer.
  2. Reportedly, the ransom note is displayed only in a case where the ‘sensitive’ information found by the ransomware includes child pornography or illegally downloaded Torrent media files.

So basically, the creators of this ransomware are targeting the victim’s fear of facing legal complications and losing their reputation instead of their data.

Further, where all ransomware creators use Bitcoin to remain hidden from law enforcement, Ransoc asks its victims to pay via credit card; this kind of payment approach has been unheard of in ransomware attacks till now.

How Quick Heal helps?

Quick Heal’s Virus Protection proactively detects the ransomware as “Ransomware.TorLocker.PB5” and prevents it from performing any activity on your computer.

Quick heal Total Security Detected Ransomeware

How to stay safe from ransomware attacks

  • Never click on links or download attachments that arrive in emails from unwanted, unknown or unexpected sources.
  • Apply all recommended security updates (patches) to your Operating System, and programs like Adobe, Java, web browsers, etc.
  • Take regular backups of your files. Remember to disconnect the Internet when you are backing up on a hard drive. Unplug the drive before you go online again.
  • Avoid using outdated browser plugins or plugins that you do not use anymore.
  • Invest in an antivirus software that comes with several layers of security such as Web Security that blocks infected websites, Email Security that blocks infected emails, Phishing Protection that blocks fake websites, etc.
  • Always keep your antivirus software up-to-date to stay safe against new threats.

Reference by Quickheal


How to setup Google Sync on your iPhone or iPad

How to set up Google Sync on your iPhone or iPad

The Google Sync setup is nearly identical to Exchange: You just need to have a paid Google account and enter the following settings.

  1. Launch the Settings app from your Home screen.
  2. Tap Calendar.
  3. Tap Accounts.
  4. Tap Add Account.
    calendar-ios-10-set-up-google-account-screens
  5. Tap Exchange.
  6. Enter your Gmail or Google Account email and password (the description field will automatically update as your email address).
  7. Tap on Next.
    calendar-ios-10-set-up-exchange-google-screens-01
  8. Enter m.google.com as the Server.
  9. Leave the Domain field blank.
  10. Enter your full Gmail or Google Account email address as the Username. (Yup, just like above.)
  11. Tap on Next.
    calendar-ios-10-set-up-exchange-google-screens-02
  12. Tap the switches next to each service’s account that you’d like to sync with your phone. If you have existing calendars, contacts, or mail on your iPhone, you’ll be asked to either keep them on your phone or delete them. Tap the option you want.
  13. Tap on Save.

google sync calendar-ios-10-set-up-exchange-google-screens-03


Google Drive sharing notification improvements to support Gmail smart hosting

Some small but important changes are coming to the way that Google Drive sends notification emails. Your users will not see any visible changes, but if you use Gmail’s advanced smart hosting features, then you may notice a difference in the way new emails are archived or filtered by your mail solutions.

What’s changing:

  • Google Drive will no longer store a ‘courtesy copy’ in the mailbox of the sender. Gmail’s comprehensive mail storage feature will now place a copy of Drive sharing notification emails in the sender’s Sent folder.
  • If you use smart hosting (through an outbound mail server), you can now capture and deliver these emails through your preferred mail gateway.
  • If you previously relied on outbound gateway settings to route Drive notifications, you can now use content compliance rulesor sending routing rules to route these messages, making it consistent with other mail routing features.

What’s not changing:

  • The “from” field is not changing. It will continue to be the sender when the recipient is a group, or drive-shares-noreply@google.comin all other cases, as it is today.
  • The message header fields are not changing. The envelope sender will still be [string]@doclist.bounces.google.com, not the actual account of the sender.
  • Request access notifications will not behave differently.

These changes will roll out to G Suite customers over a few days, starting on November 28, 2016.

Launch Details
Release track:
Launching to both Rapid and Scheduled release

Editions:
Available to all G Suite editions

Reference by Google.com