Search emails by size more easily

The Gmail advanced search box now has an option to search emails by size. Emails can now be searched without using operators like “size:” and “larger:”. The advanced search options can be accessed by clicking on the down arrow in the search box in Gmail.

Release track:
Rapid release

Editions included:
Google Apps for Business, Education and Government

For more information:
https://plus.google.com/+Gmail/posts/9UAPTmRkRxG

Reference by : http://www.google.com/

Using Google Apps on your Android phone

Using Google Apps on an Android is really easy. Just add your Google Apps account to the phone, then select the services you want to use. Each user should follow these instructions on their own phone.

  1. Open the Accounts & Sync Settings screen on your phone. You can do this in Contacts by pressing Menu and touching Accounts, or directly in the Settings application.
  2. The Accounts & Sync Settings screen displays your current sync settings and a list of your current accounts.
  3. Touch Add account.
  4. Touch Google to add your Google Apps account.
  5. Touch Sign in when prompted for your Google Account.
  6. Enter your full Google Apps email address as your username, and then enter your password.
  7. Select which services you’d like to sync between your phone and Google Apps.

Set up email on a BlackBerry

Set up POP or IMAP email on a BlackBerry®

  1. From the BlackBerry® home screen, select BlackBerry Setup > Set up Internet E-mail > Add An Email Account.
  2. Type your email address and password, and then select Next.
  3. Your BlackBerry will try to set up your email account automatically. If setup completes successfully, skip to the next step. If your email account can’t be configured automatically, do the following:
  1. Select I will provide the settings to add this email account.
  2. Scroll down, and then select Next.
  3. Select Internet Service Provider Email (POP/IMAP), and then select Next.
  4. Type your full email address for your user name (for example, tony@contoso.com).
  5. Scroll down and type the name of your email server. If you’re connecting to your Office 365 email, the IMAP or POP server name is outlook.office365.com. If you’re not using Office 365, see Find your POP and IMAP server settings later in this article.
  6. Select Next.
  7. Enter the name of the outgoing server. If you’re connecting to your Office 365 email, the SMTP server name is smtp.office365.com. If you’re not using Office 365, see Find your POP and IMAP server settingslater in this article.
  1. Select OK to complete the setup.

Find your POP and IMAP server settings

If you’re connecting to your Office 365 email, the server name for IMAP and POP is outlook.office365.com and the server name for SMTP is smtp.office365.com. These are your settings if you are using the latest version of Office 365.

If you’re not connecting to Office 365 email, or if you aren’t sure if you are using the latest version of Office 365, do the following to look up your settings.

  1. Sign in to your account using Outlook Web App. For help signing in, see Sign in to Outlook Web App.
  2. In Outlook Web App, on the toolbar, select Settings  > Options > Account > My account > Settings for POP and IMAP access.
  3. The POP3, IMAP4, and SMTP server name and other settings you may need to enter are listed on the Settings for POP and IMAP Access page under POP setting or IMAP setting, and SMTP setting.

Set up a BlackBerry® Cloud Services account on a BlackBerry®

If you are an Office 365 user and your company is using BlackBerry® Business Cloud Services, you can use the service for integrated email, calendaring, and contact services with Microsoft Exchange Online.

If you are not an Office 365 user, but have a mailbox on an Exchange server that is using BlackBerry® Enterprise Server and BlackBerry® Enterprise Server Express, you will also be able to use the service for integrated email, calendaring, and contacts with Microsoft Exchange Online.

After your administrator has set up your BlackBerry® device, you can manage the settings on your phone yourself. To manage your BlackBerry® smartphone, go to the BlackBerry Web Desktop Manager.

What else do I need to know?

  • The POP, IMAP, and SMTP server names for Office 365 users shown earlier in this article applies to accounts that are on the latest version of Office 365 (sometimes referred to as Office 365 after the service upgrade). If your account is not on the latest version of Office 365 (sometimes referred to as Office 365 pre-upgrade), you need to look up your own settings. Check out Am I using Office 365 after the service upgrade? to determine if your account is on the latest version of Office 365.
  • If you see Not available under POP setting, IMAP setting, and SMTP setting, you may need to contact the person that manages you email account to determine your Exchange ActiveSync server name.
  • If your email account is the type that requires registration, you must register it the first time you sign in to Outlook Web App. Connecting to your email account through a mobile phone will fail if you haven’t registered your account through Outlook Web App. After you sign in to your account, sign out. Then try to connect using your mobile phone. For more information about how to sign in to your account using Outlook Web App, see Sign in to Outlook Web App.
  • If you connect to your account using a POP or IMAP connection, you will only be able to use and synchronize your email using a wireless connection. For information about how to synchronize the contacts and calendar between your BlackBerry® and your account using a wired connection, see BlackBerry® Desktop Software at the BlackBerry® Web site.
  • BlackBerry® Business Cloud Services Microsoft Office 365 is a feature that provides enhanced features for BlackBerry® device users with Office 365 accounts. Email administrators may visit BlackBerry® Business Cloud Services for Microsoft Office 365 to learn more about this service.


 Reference by http://www.microsoft.com

Setting a Sent Mail folder in Webmail

  1. Open the options link on the left-hand side
  2. Open the Mail tab
  3. Under General Options, open “Personal Information.”
  4. At the bottom of the screen, select the box named “Save sent mail?”
  5. From the drop-down box, select a folder where you want your mail saved or create a new folder for saved mail.
  6. Click on Save Options to save your changes.

The Risk of Running Windows XP After Support Ends April 2014

Back in April I published a post about the end of support for Windows XP called The Countdown Begins: Support for Windows XP Ends on April 8, 2014.  Since then, many of the customers I have talked to have moved, or are in the process of moving,  their organizations from Windows XP to modern operating systems like Windows 7 or Windows 8.

There is a sense of urgency because after April 8, Windows XP Service Pack 3 (SP3) customers will no longer receive new security updates, non-security hotfixes, free or paid assisted support options or online technical content updates.  This means that any new vulnerabilities discovered in Windows XP after its “end of life” will not be addressed by new security updates from Microsoft.  Still, I have talked to some customers who, for one reason or another, will not have completely migrated from Windows XP before April 8.  I have even talked to some customers that say they won’t migrate from Windows XP until the hardware it’s running on fails.

What is the risk of continuing to run Windows XP after its end of support date?  One risk is that attackers will have the advantage over defenders who choose to run Windows XP because attackers will likely have more information about vulnerabilities in Windows XP than defenders. Let me explain why this will be the case.

When Microsoft releases a security update, security researchers and criminals will often times reverse engineer the security update in short order in an effort to identify the specific section of code that contains the vulnerability addressed by the update. Once they identify this vulnerability, they attempt to develop code that will allow them to exploit it on systems that do not have the security update installed on them. They also try to identify whether the vulnerability exists in other products with the same or similar functionality. For example, if a vulnerability is addressed in one version of Windows, researchers investigate whether other versions of Windows have the same vulnerability.  To ensure that our customers are not at a disadvantage to attackers who employ such practices, one long standing principle that the Microsoft Security Response Center (MSRC) uses when managing security update releases is to release security updates for all affected products simultaneously.  This practice ensures customers have the advantage over such attackers, as they get security updates for all affected products before attackers have a chance to reverse engineer them.

But after April 8, 2014, organizations that continue to run Windows XP won’t have this advantage over attackers any longer.  The very first month that Microsoft releases security updates for supported versions of Windows, attackers will reverse engineer those updates, find the vulnerabilities and test Windows XP to see if it shares those vulnerabilities.  If it does, attackers will attempt to develop exploit code that can take advantage of those vulnerabilities on Windows XP.  Since a security update will never become available for Windows XP to address these vulnerabilities, Windows XP will essentially have a “zero day” vulnerability forever.  How often could this scenario occur?  Between July 2012 and July 2013 Windows XP was an affected product in 45 Microsoft security bulletins, of which 30 also affected Windows 7 and Windows 8.

Some of the people I have discussed this scenario with are quick to point out that there are security mitigations built into Windows XP that can make it harder for such exploits to be successful.  There is also anti-virus software that can help block attacks and clean up infections if they occur.  The challenge here is that you’ll never know, with any confidence, if the trusted computing base of the system can actually be trusted because attackers will be armed with public knowledge of zero day exploits in Windows XP that could enable them to compromise the system and possibly run the code of their choice. Furthermore, can the system’s APIs that anti-virus software uses be trusted under these circumstances? For some customers, this level of confidence in the integrity of their systems might be okay, but for most it won’t be acceptable.

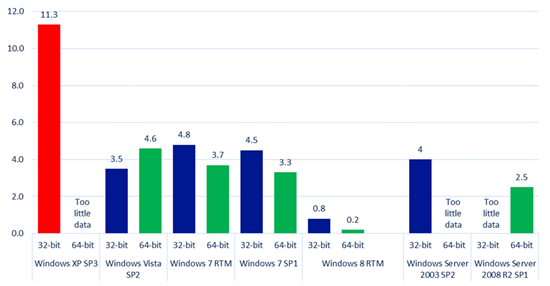
As for the security mitigations that Windows XP Service Pack 3 has, they were state of the art when they were developed many years ago.  But we can see from data published in the Microsoft Security Intelligence Report that the security mitigations built into Windows XP are no longer sufficient to blunt many of the modern day attacks we currently see.  The data we have on malware infection rates for Windows operating systems indicates that the infection rate for Windows XP is significantly higher than those for modern day operating systems like Windows 7 and Windows 8.

Figure 1: Infection rate (CCM) by operating system and service pack in the fourth quarter of 2012 as reported in the Microsoft Security Intelligence

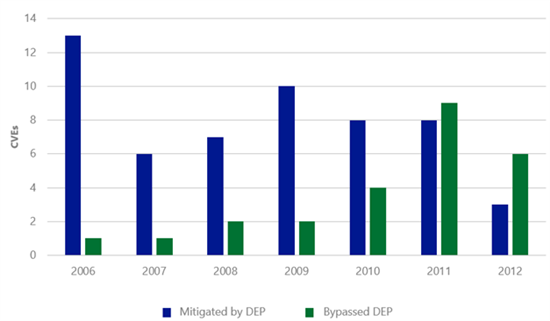
I recently wrote about the findings of a new study on exploit activity that we just published: Software Vulnerability Exploitation Trends – Exploring the impact of software mitigations on patterns of vulnerability exploitation. This seven-year study indicates that attackers have evolved their attacks to overcome one of the key security mitigations that Windows XP has: Data Execution Prevention (DEP). Figure 3 shows the number of common vulnerabilities and exposures (CVEs) that had exploits that would have been mitigated if DEP were enabled compared to the number of CVEs that had exploits that bypassed DEP. With the exception of 2007 and 2008, there appears to be a clear downward trend in DEP’s ability to retroactively break exploits. This trend is not because DEP is no longer effective; rather, it is an indication that attackers have been forced to adapt to environments in which DEP is already enabled—at increased cost and complexity. The evidence is the increasing number of CVEs that had exploits that bypassed DEP.

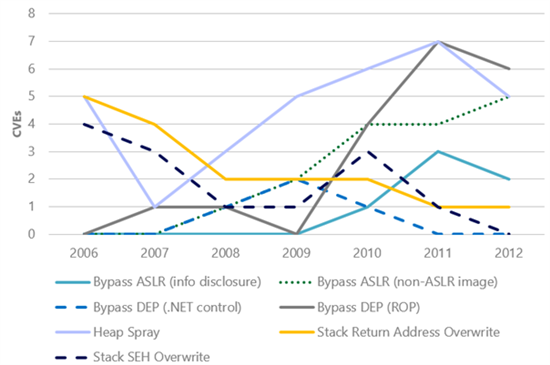
Figure 2 (left): The number of CVEs that were exploited using specific exploitation techniques; Figure 3 (right): The number of CVEs for which exploits were written that could have been mitigated by enabling DEP as compared to the number of CVEs that had exploits that bypassed DEP

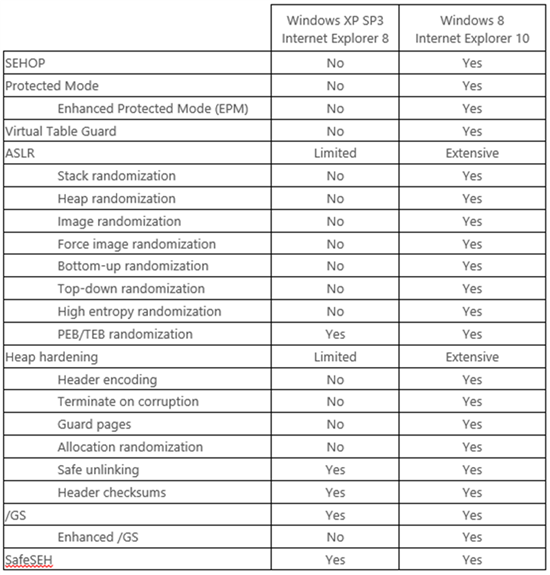
This new data shows us that the predominate threats that individuals and organizations face are now much different than they were when Windows XP Service Pack 3 was released. Turning on the Windows Firewall in Windows XP Service Pack 2 and later operating systems forced attackers to evolve their attacks. Rather than actively targeting remote services, attackers now primarily focus on exploiting vulnerabilities in client applications such as web browsers and document readers. In addition, attackers have refined their tools and techniques over the past decade to make them more effective at exploiting vulnerabilities. As a result, the security features that are built into Windows XP are no longer sufficient to defend against modern threats. Windows 8 has significantly superior security mitigations compared to Windows XP as Figure 4 illustrates. Detailed information on the new security mitigations built into Windows 8 is available in the aforementioned research paper.

Figure 4: The table below compares the mitigation features supported by Internet Explorer 8 on Windows XP Service Pack 3 with the features supported by Internet Explorer 10 on Windows 8. As this table shows, Internet Explorer 10 on Windows 8 benefits from an extensive number of platform security improvements that simply are not available to Internet Explorer 8 on Windows XP.

Organizations need a level of certainty about the integrity of their systems. Minimizing the number of systems running unsupported operating systems is helpful in achieving that. End of support for Windows XP is April 8, 2014.

Reference by http://www.microsoft.com

Google Apps Migration for Outlook

1. Download, install, and import

You can use Google Apps Migration for Microsoft Outlook® to import data from a Microsoft® Exchange account or PST file, by stepping through a simple migration wizard. You can import your mail, personal contacts, and calendar events, either all at once, or one application at a time.

  1. If you haven’t already, sign in to your Google Apps account on the web at least once, to accept Google’s Terms and Conditions.
  2. Install Google Apps Migration for Microsoft Outlook® on the computer where you run Microsoft Outlook®, which should not be running. Use one of the methods below to install (whichever one applies for you).
  1. If you are your domain’s administrator, enable Google Apps Migration for Microsoft Outlook® for your domain by making some quick settings in your Google Apps control panel, as described in these system requirements. Otherwise, skip this step as it’s probably already been done for you.
  2. Review these system requirements for your computer. Before continuing with installation, install any necessary updates to your version of Microsoft Outlook® or Windows.
  3. Go to the Google Apps Migration for Microsoft Outlook® download page and click the big blue download button to download and install the utility.
  4. From the Windows Start menu, open Google Apps Migration for Microsoft Outlook®.

If you belong to a large organization, your administrator might have prepared an installation file for you. In that case, all you have to do is install it.

  1. From your Windows Control Panel, open Run Advertised Programs, select Google Apps Migration for Microsoft Outlook® from the list of programs, and click Run to install the wizard.
  2. From the Windows Start menu, open Google Apps Migration for Microsoft Outlook®.

After starting the wizard, you’re asked to sign in to your Google Apps account…

2. Sign in to Google Apps

After starting Google Apps Migration for Microsoft Outlook®, you’re prompted to sign in to your Google Apps account. Signing in here lets Google Apps Migration connect to your account to get ready for importing.


  1. Enter the email address that you use to log in to your Google Apps account.
  2. Enter your password, choosing one of the following options:No, help me sign in: Select this option if you’ll be using a non-Google Apps password to sign in to your account—that is, if your administrator has set up a Single Sign On service that signs you in to other services in your organization, along with your Google Apps account.Yes, I have a password: Select this option if you’ll be signing in with your Google Apps password. Then enter the password here, too. (If no one has told you otherwise, this is probably the option you should select.)
  3. Check Remember me if you think you might be importing data to this account again from the command line. That way, when you next import data from the command line, Google Apps Migration won’t ask you to sign in.
  4. Click Next in the wizard to continue.

Now you need to choose the Microsoft Outlook® profile you want to import..


3. Choose what Outlook data to import

Next, Google Apps Migration for Microsoft Outlook® asks you to select where to import data from. You can import data directly from a Microsoft® Exchange profile. Or export it first from Microsoft Outlook® as one or more PST files, and import those files.

  1. Choose where to import your data from, as follows:If your existing profile is listed, choose its profile name to import directly from the profile—Google Apps Migration takes a snapshot of the profile’s current data and imports just that. If instead you’ve exported your data to a PST file, choose From PST File(s) and browse to the file on your computer or network. (Control-click multiple PST files to import them all at once.)
    You can’t import PST files that are read-only. The migration utility needs write permission to access your data

  2. If you’ve already imported data into this account, choose the appropriate migration option, as described below. (If you’re importing for the first time, either option works fine):
    • Migrate all data: Imports all your mail, contacts, and calendar events. You can choose this option for your initial migration. Or, choose it if you’ve deleted all previously imported data from this account (such as after a test migration), and want to import all your data again.
      If you already have data in this Google Apps account, choosing this option will import duplicate contacts and overwrite your existing calendar data (email won’t be duplicated).
    • Migrate only new data: Imports only data that hasn’t been imported before (doesn’t duplicate contacts or overwrite existing calendar data). Choose this option to resume a migration that didn’t fully complete (say, if you had to turn your computer off), or to import data that arrived after your first migration.
  3. Click Next in the wizard to continue.

All that’s left is selecting what data to import…

4. Start importing data

Finally, you need to select what data to import—your email, contacts, calendar events, or all of the above.

Specify what to import, and whether to import only mail that was sent before or after a particluar date (just check each appropriate box). To speed up your import, uncheck Junk mail and Deleted items as you probably don’t need any of these messages.

Importing before or after a particular date? The date you choose is effective as of midnight GMT. Messages are migrated based on the time they were submitted to the Microsoft® Exchange server as outgoing messages.

The following data can be imported from the current Microsoft Outlook® profile or PST file:

  • Email messages: Messages from all folders in your profile or PST file, except the Deleted Items, Junk E-mail, and Public folders.
  • Deleted messages: Messages from your Deleted Items folder.
  • Junk email: Messages from your Junk E-mail folder.
  • Contacts: Personal contacts (global contacts are provided by your administrator).
  • Calendars: Events from your all your calendars.

Note that Microsoft Outlook® Notes, journal entries, and tasks are not imported, since these features aren’t available in Google Apps.

  1. Click Migrate in the wizard to begin importing. If you’re importing from a Microsoft Outlook® profile rather than a PST file, you might be prompted to log in to your profile.

Now just sit back and let your data import. Here’s what to expect…

5. Monitor your migration

Once you start the migration, Google Apps Migration for Microsoft Outlook® begins to import data to your Google Apps account. Contacts are imported first, followed by calendar data, and then email. If you’re importing more than one PST file or email account, each file or account is imported in sequence (completing one before moving on to the next).

If you’re importing from a Microsoft® Exchange profile, Google Apps Migration takes a snapshot of data currently in the profile and imports just that; it doesn’t import any messages received afterwards.

You can monitor your migration’s process to see the number of items migrated and the number of items remaining.

When your migration has finished, you can click Start new migration to import more data (if you’re migrating in stages). Otherwise, click Cancel to close the wizard.

You’re now ready to log in to your Google Apps account!

What to expect during migration

  • How long does it take? Depending on how much mail and other data you have, it might take several hours for all of it to import (although you can begin to work in your Google Apps account right away).
  • Pause a migration. To temporarily halt importing, click Pause Migration. Click Resume Migration to continue importing from where you left off.
  • Restart a migration. If your import is interrupted and you need to run the migration again (say, if you click Cancel in the wizard or if you have to shut down your computer), simply rerun the wizard. To avoid importing duplicate contacts, select the option to Migrate only new data.
  • My Internet connection went away. If the migration is interrupted without closing the wizard—say, if your Internet connection goes away—it will resume where it left off if the connection comes back soon. Otherwise, you should start a new migraiton. To avoid importing duplicate contacts, select the option to Migrate only new data.


Hijacked Chrome extensions cleanup

We have found that some Chrome extensions come bundled with malicious programs that try to hijack your browser settings. To help keep your browser settings under your control we added a “reset browser settings” button to Chrome’s settings page in October.

Despite this, settings hijacking remains our number one user complaint. To make sure the reset option reaches everyone who might need it, Chrome will be prompting Windows users whose settings appear to have been changed if they’d like to restore their browser settings back to factory default. If you’ve been affected by settings hijacking and would like to restore your settings, just click “Reset” on the prompt when it appears.

Note that this will disable any extensions, apps and themes you have installed. If you’d like to reactivate any of your extensions after the reset, you can find and re-enable them by looking in the Chrome menu under “More tools > Extensions.” Apps are automatically re-enabled the next time you use them.

Editions included: 
Google Apps for Business, Education, and Government

For more information:
http://chrome.blogspot.com/2014/01/clean-up-your-hijacked-settings.html
http://chrome.blogspot.com/2013/10/dont-mess-with-my-browser.html

Reference by : http://www.google.com/