- Login with your Username & Password
- Once Login just change the password
- On top Right there is an option Outlook just click on it.

What you’ll see in Mail
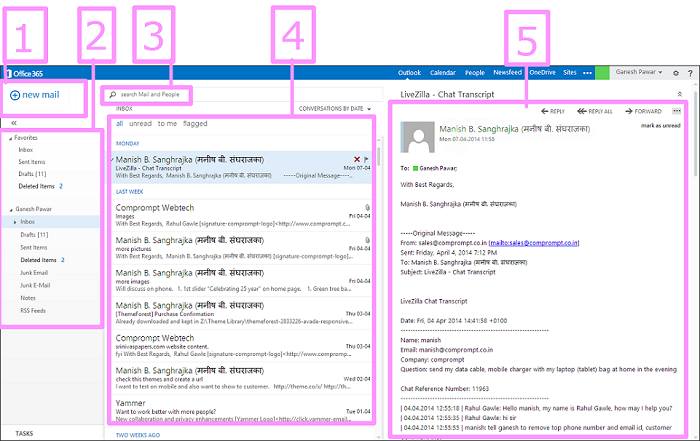
This is where you’ll find your messages.
- Create a new message by clicking
 New mail.
- Folder list. The folder list includes the folders in your mailbox. It may include other folders, such as Favorites and archive folders. You can collapse this pane by clicking the folder icon at the top. You can expand and collapse folders in this view by clicking the triangle icons next to the folder names.
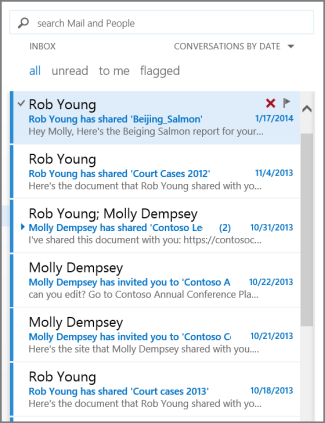
- Search window. Type what you want to search for here, such as the name of a person you want to find messages from, or text that you want to search for to find a particular message.
- The message list is a list of the messages in the current folder. Each entry in the list view has additional information, such as how many unread messages there are in a conversation, or if there’s an attachment, flag, or category associated with any messages in the conversation. A conversation can have one or more messages. When a conversation is selected, you can delete it, add a flag, or add a category by clicking the icons. At the top of the list view are filters that you can click to quickly find messages that are unread, that include your name in the To or the Cc line, or that have been flagged. In addition to the filters, you’ll see the name of the folder you’re viewing and the view that you’ve selected.
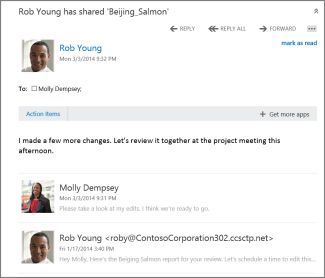
- The reading pane is where the conversation that you’ve selected is displayed. You can respond to any message in the conversation by using
 Reply,
  Reply all or
  Forward at the top of a message to respond to it.
- For information about responding to messages you’ve received, see Responding to messages. For information about printing, see Printing messages.
Create a new message
To create a new message:
- Click New mail above the folder list. A new message form will appear in the reading pane.
- To add recipients, you can type the name of anyone who is in your contacts folder or organization’s address list, or you can type the email address in the To or cc field. The first time you enter a particular person’s name, Outlook Web App searches for that person’s address. In the future, the name will be cached so it will resolve quickly.
- Add a subject.
- Type the message you want to send.
- To add an attachment, click
 Insert then Attachment at the top of the screen and browse to the file you want to attach. For more information, see Working with attachments.
- To embed a picture in the message so that it appears without the recipient having to open it, click Insert, then Picture, and browse to the picture you want to add to your message.
- When you’re done and your message is ready to go, click
 Send.
Send.
Working with drafts
If you can’t finish writing a message right away, or want to wait a bit before you send it, you can click away from it and come back to it later to finish it. Outlook Web App automatically saves your message as you create it and adds it to your drafts folder. When you’re ready to send your message:
- Find the Drafts folder in the folder list and click on it.
- Click on the message you were working on to see it in the reading pane.
- Click
 Continue editing or, if you’ve decided you don’t want to send the message after all, click
  Discard.
- If you still want to send the message, finish editing it and click Send.
Open a message in a separate window
By default, you read and create messages in the reading pane, but that isn’t always what you need. Sometimes you need to be able to view a message in a separate window.
When you’re composing a new message or replying to or forwarding a message that you’ve received, you can pop it out into a new window by clicking the pop out icon  in the upper corner of the message.
To open a message that you’re reading in a separate window, click the extended menu icon and select open in separate window.
Mail, one section at a time
Folder list
The folder list will show the default folders that are created for all mailboxes, plus any folder that you create. Depending on the setup in your organization, you may also see Favorites and Archive folders.
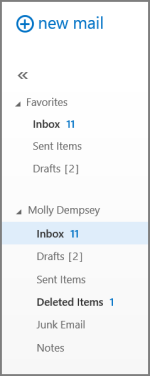
You can close the folder list by clicking the chevron at the top of the list. Click any folder in the list to view its contents.
You can right-click any item in the folder list to see a menu of things you can do that will affect folders—such as create a new folder, delete an existing folder, or empty the Deleted Items folder.
Search and built-in filters
You’ll find a search window and built-in filters at the top of the message list.

- To search, click Search and start typing what you want to look for. A list of suggestions will appear underneath, and you can click on one of those to search for that item. Or you can finish entering your own search and then press Enter to start your search. To clear your search, click the icon at the right of the search window.
- The built-in filters, all, unread, to me and flagged, are a way to quickly choose what to display in the message list. All shows all messages, unread shows message that haven’t been marked as read, to me shows all messages where your name appears in the To or Cc list, flagged shows all messages that have been flagged.
For more information about searching, see Search in Outlook Web App.
Message list
The message list shows the messages in the current folder. The messages displayed can be managed by selecting a filter or using search. The message list has tools to let you take care of some tasks quickly.
- By selecting icons at the right of the message list, you can delete a message or conversation, or add a flag. Other icons will show you which messages have attachments, importance of (high or low), and how many unread items there are in a conversation.
- By right-clicking a message, you can see a menu of options, such as mark a message read or unread, move it to another folder, or create a rule based on that message.
- By clicking the triangle to the left of a message, you can expand a conversation to see all messages in that conversation.
- Use the label at the top of the message list to switch between viewing Conversations by date and Items by date.
Reading pane
The reading pane is where messages are displayed. Not only can you read messages in the reading pane, you can respond to them without opening a new window.
- Select Reply, Reply all or Forward at the top of a message to respond to it. A blank message will appear in the reading pane at the top of the conversation.
- Use Mark as read and Mark as unread to change the read status of a message.
- View a menu of more options by selecting the icon for the extended menu.
- The reading pane is fixed and can’t be moved or turned off in the current release.